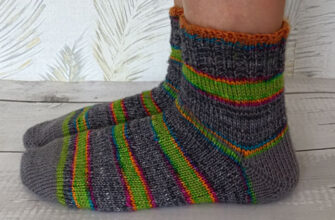
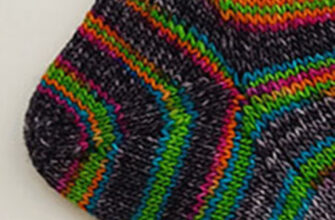
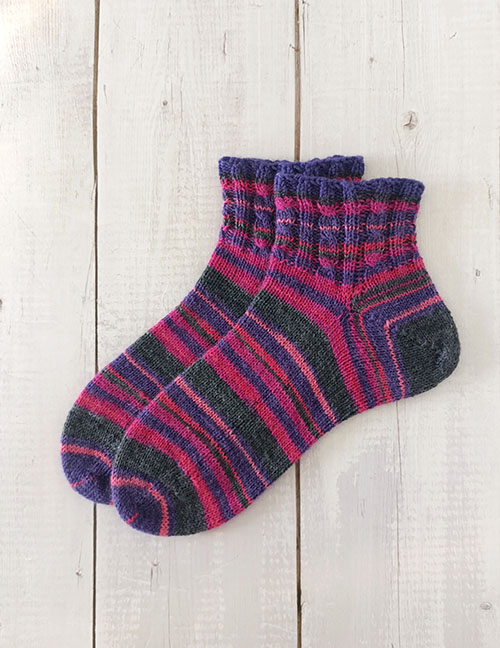
I would like to show you how to knit toe-up socks from self-striping yarn using an additional cast-on for the heel. A single 50 g skein of self-striping yarn is enough to make a stylish pair of short socks knitted from the toe up. This tutorial is suitable for knitting children’s and women’s socks up to EU size 39.
Toe-up knitting allows you to use all the yarn without leftovers and avoids complicated calculations for the leg length, where even a small mistake may leave you without enough yarn to finish the project.
Knitting two socks at the same time on long circular needles significantly speeds up the process. In addition, the heel worked with an additional cast-on in the round helps preserve the beautiful color sequence of the self-striping yarn.
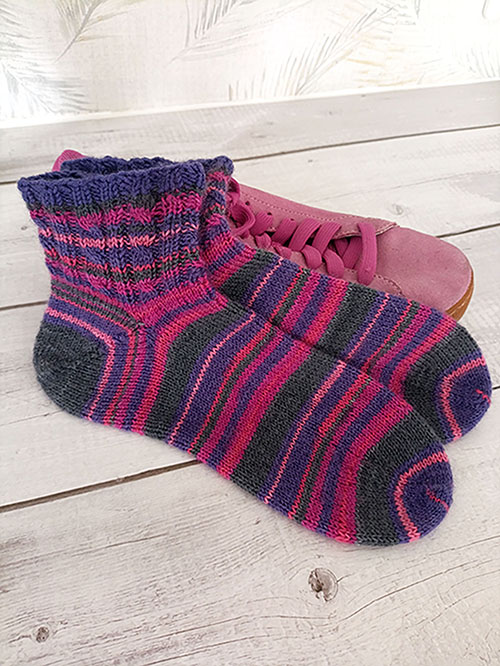
Materials, Tools, and Knitting Techniques
Sizes
22–23; 24–25; 26–27; 28–29; 30–31; 32–33; 34–35; 36–37; 38–39.
Approximate UK / US shoe sizes:
- EU 22–23 = UK 5–6 Child / US 6–7 Child
- EU 24–25 = UK 7–8 Child / US 8–9 Child
- EU 26–27 = UK 9 Child – 10 Child / US 10–11 Child
- EU 28–29 = UK 11 Child – 12 Child / US 12–13 Child
- EU 30–31 = UK 12.5 Child – 13 Child / US 13.5 Child – 1 Youth
- EU 32–33 = UK 1–2 / US 2–3 Youth
- EU 34–35 = UK 2.5–3 / US 4–5 Women
- EU 36–37 = UK 3.5–4.5 / US 5.5–6.5 Women
- EU 38–39 = UK 5–6 / US 7–8 Women
Materials and Tools
- Regia sock yarn (50 g / 210 m), composition: 75% wool, 25% polyamide. Color 01839 (pink-lilac-gray).
- 2.5 mm =US 1.5 = UK 12 circular needles with a cable longer than 80 cm.
- 2.5 mm = US 1.5 = UK 12 double-pointed needles.
- Spare needles or stitch holders.
- Tapestry needle.
Stitches and Techniques
- Stockinette stitch.
- Ribbing with small cables:
- Rows 1–2: k2, p2, k4, p2.
- Row 3: k2, p2, slip 2 stitches onto a cable needle and hold in front of work, knit 2 stitches, knit 2 stitches from the cable needle, p2.
- Rows 4–8: k2, p2, k4, p2.
- Judy’s Magic Cast-On method (detailed instructions are provided in a separate article).
- Knitting two items at the same time using the Magic Loop technique (detailed instructions are provided in a separate article).
- Triple decorative left-leaning decrease:
Knit 2 stitches together through the front loops (insert the right needle into the front loop, slip the stitch knitwise; slip the second stitch the same way; return both stitches to the left needle and knit them together; pass the third stitch over the worked stitches). - Increase stitches by knitting into the front and back of the stitch.
- Kitchener stitch (grafting).
Gauge
28 stitches × 40 rows = 10 × 10 cm = 4 х 4 in.
How to Knit Toe-Up Socks from Self-Striping Yarn
How to Start Knitting Toe-Up Socks from Self-Striping Yarn
To knit matching toe-up short socks from self-striping yarn, first divide the yarn into two separate balls, carefully matching the color sequence for both socks.
The stitches are cast on using Judy’s Magic Cast-On method. Cast on the stitches for the first sock from the first ball of yarn, then slide the stitches along the cable. After that, cast on the stitches for the second sock in the same way.
Number of Cast-On Stitches for One Sock (per needle)
- 8 stitches — sizes EU 22–23; 26–27
- 10 stitches — sizes EU 28–29; 30–31; 32–33
- 12 stitches — sizes EU 34–35; 36–37; 38–39
Total Number of Cast-On Stitches for One Sock
- 16 stitches — sizes EU 22–27
- 20 stitches — sizes EU 28–33
- 24 stitches — sizes EU 34–39
If the cast-on is done correctly:
- the right side will appear smooth,
- while the wrong side will show the characteristic purl bumps.
Toe
Begin knitting the toe of the right sock from the sole side of the foot.
Using the working needle, knit the stitches of the right sock from the first ball of yarn, then knit the stitches of the left sock from the second ball. Turn the work.
Next, knit the stitches of the left sock from the second ball, then the stitches of the right sock from the first ball.
This completes the first round.
Starting from Round 2, work increases every second round.
To do this, increase 1 stitch from both the first and last stitch on each needle by knitting into the front and back loop of the stitch. As a result, each sock increases by 4 stitches every second round.
Round 1
Right sock — knit 8 (10, 12) stitches.
Left sock — knit 8 (10, 12) stitches. Turn the work.
Left sock — knit 8 (10, 12) stitches.
Right sock — knit 8 (10, 12) stitches. Turn the work.
Round 2
Right sock — Increase 1 stitch from the first knit stitch by knitting into the front and back loop; knit 6 (8, 10); increase 1 stitch from the last knit stitch.
Left sock — Increase 1 stitch from the first knit stitch; knit 6 (8, 10); increase 1 stitch from the last knit stitch.
Turn the work and repeat first for the left sock, then for the right sock.
Repeat Rounds 1–2 until the required number of stitches for the foot is reached.
Number of Stitches for One Sock
- 20 (40) stitches — size EU 22–23
- 24 (48) stitches — sizes EU 26–27; 28–29
- 26 (52) stitches — sizes EU 30–31; 32–33
- 28 (56) stitches — sizes EU 34–35; 36–37
- 30 (60) stitches — size EU 38–39
The number before the parentheses indicates the number of stitches on each needle; the number in parentheses indicates the total number of stitches for one sock.
If everything is done correctly, the finished toe will look neat and symmetrical.
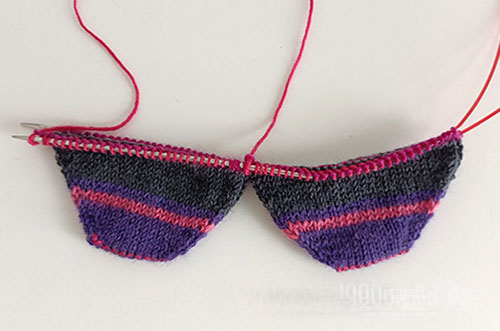
Foot
Continue working in the round in stockinette stitch until the length of the sock from the toe reaches:
- 12 cm — size EU 22–23
- 13.5 cm — size EU 26–27
- 14 cm — size EU 28–29
- 15 cm — size EU 30–31
- 16.5 cm — size EU 32–33
- 17 cm — size EU 34–35
- 18 cm — size EU 36–37
- 20 cm — size EU 38–39
Approximately 1 cm before the start of the heel, begin increasing every other round at the back of the sock to create additional heel depth.
To do this, work increases from the second stitch at the beginning of the needle and the second-to-last stitch at the end of the needle by knitting into the front and back loop of each stitch.
As a result, the number of stitches at the back of the sock should increase by 4 stitches.
Heel with an Additional Cast-On
Now let’s look at how to knit socks from self-striping yarn using an additional cast-on for the heel. First, place the stitches of the front part of the sock onto a spare needle, scrap yarn, or stitch holder. The heel is then formed using an additional cast-on with Judy Becker’s method.
Each sock is worked separately.
Round 1: Knit the stitches of the back part of the sock, and place the front stitches onto a spare needle.
Join the freed needle with another spare needle and cast on stitches using Judy Becker’s method, pulling the yarn tail from the center of the yarn ball.
The number of cast-on stitches must equal the number of stitches on the back part of the sock. While casting on, the main freed needle should be positioned on top and the additional needle underneath.
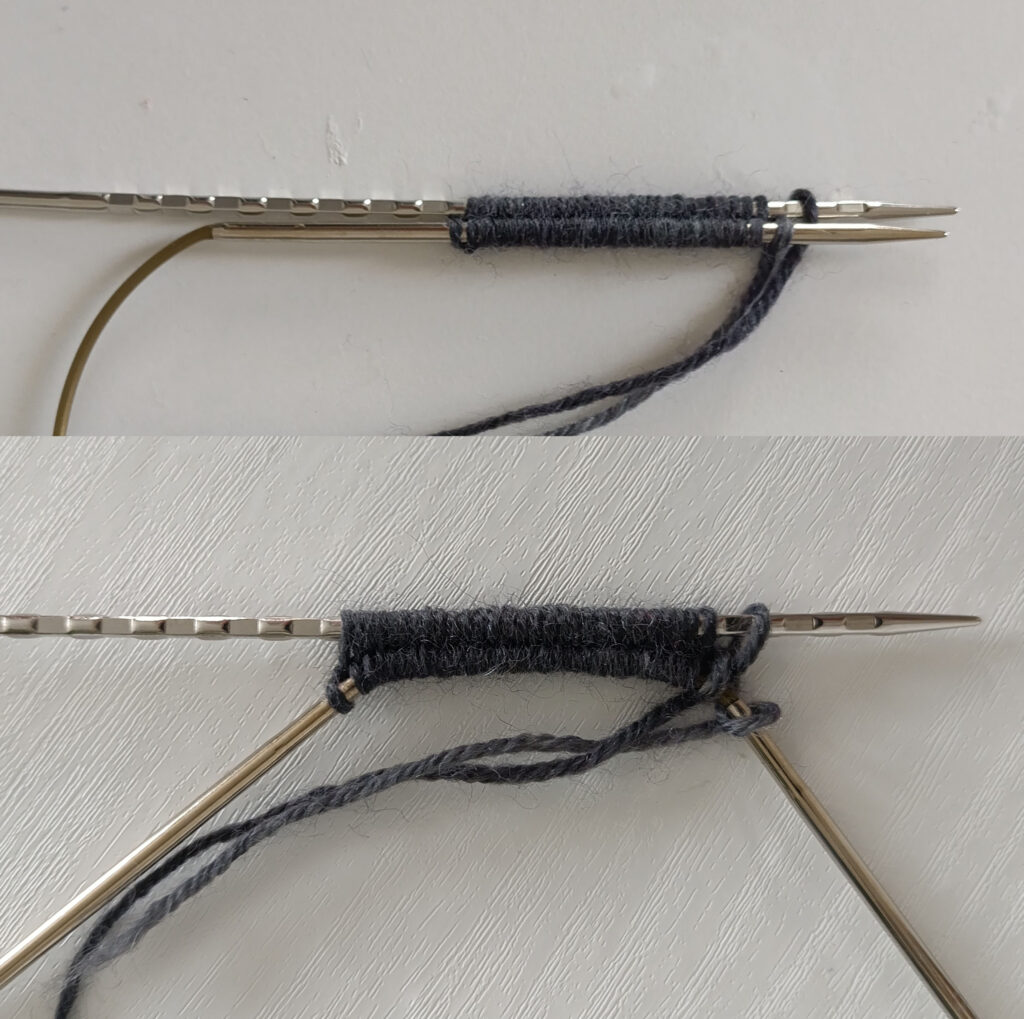
Number of Cast-On Stitches
- 24 stitches — size EU 22–23
- 28 stitches — sizes EU 26–27; 28–29
- 30 stitches — sizes EU 30–31; 32–33
- 32 stitches — sizes EU 34–35; 36–37
- 34 stitches — size EU 38–39
Slide the stitches cast onto the spare needle toward the center of the needle. Move the stitches cast onto the main needle toward the needle tip. Hold the needle in your left hand.
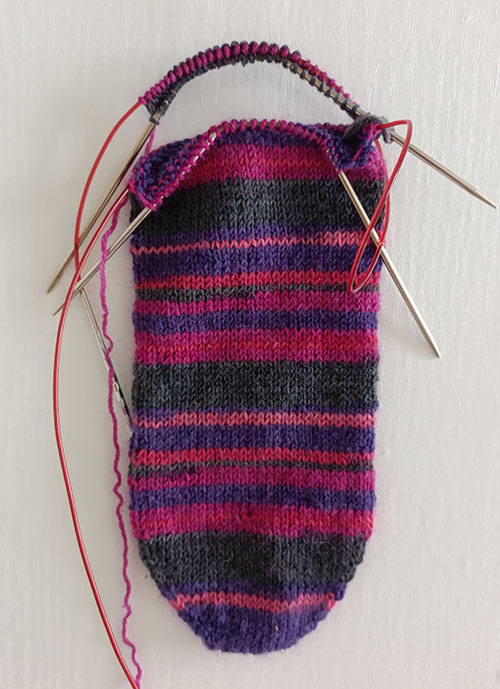
Then join the newly cast-on stitches to the stitches of the back part of the sock and continue knitting them as the stitches of the front part of the sock.
Rounds 2–4: Work in the round in knit stitches.
Repositioning the Stitches
Round 5: Knit 12 (14; 15; 16; 17) stitches and pull out the cable to mark the new beginning of the round.
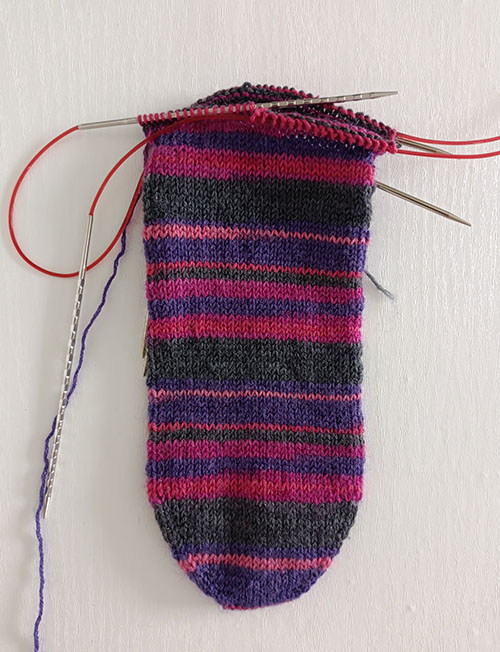
Then knit:
- 12 (14; 15; 16; 17) stitches of the second half of the back part of the sock;
- 12 (14; 15; 16; 17) stitches of the front part of the sock.
Pull out the cable again.
Next knit:
- 12 (14; 15; 16; 17) stitches of the front part of the sock,
then knit again across the first half of the back part of the sock.
This repositions the work for the decorative decreases.
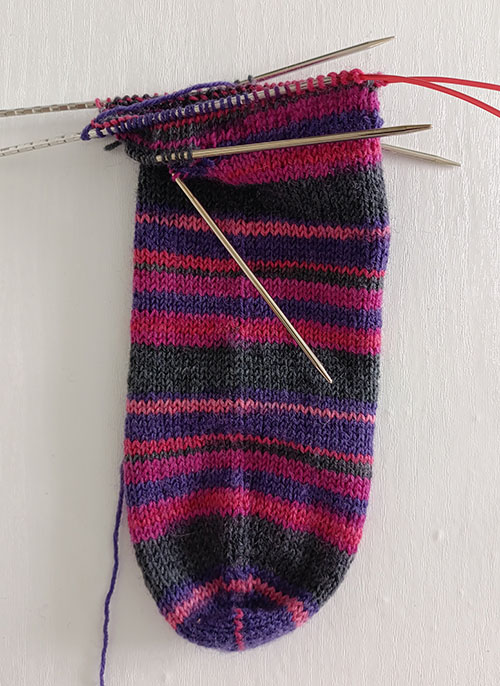
Round 6: Knit 11 (13; 14; 15; 16) stitches, k2tog left, knit 11 (13; 14; 15; 16) stitches. Turn the work. Work the stitches on the second needle in the same way.
Round 7: Knit all stitches.
Round 8: Knit 10 (12; 13; 14; 15) stitches, work a centered double decrease leaning left, knit 10 (12; 13; 14; 15) stitches. Work the stitches on the second needle in the same way.
Round 9: Knit all stitches.
Repeat Rounds 8 and 9 until the following number of stitches remains on each needle:
- 8 (10; 11; 11; 12) stitches
In the final round, reposition the stitches on the needles so they are parallel to the toe and foot again.
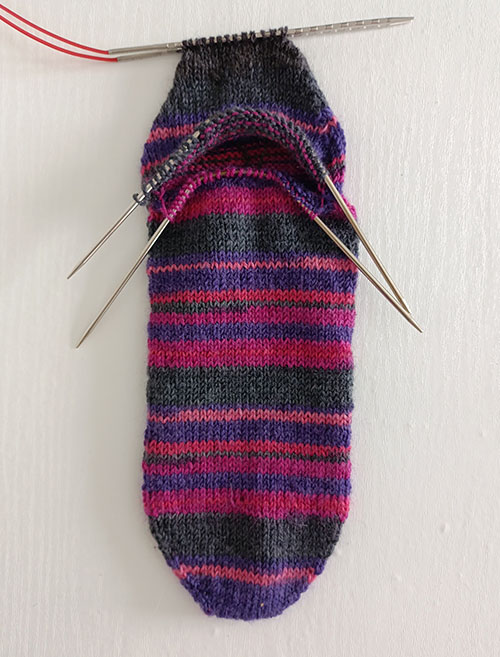
Join the remaining stitches using the Kitchener stitch (grafting).
The heel with the additional cast-on is complete. Knit the heel of the second sock in the same way.
Cuff (Leg)
Transfer the sock stitches from the auxiliary needles to the main needles and place both socks side by side for simultaneous knitting.
Continue in stockinette stitch while decreasing the extra stitches previously added for heel depth at the back of the sock. After decreases, the total number of stitches should be a multiple of 10 — the repeat of the “small braided rib” pattern.
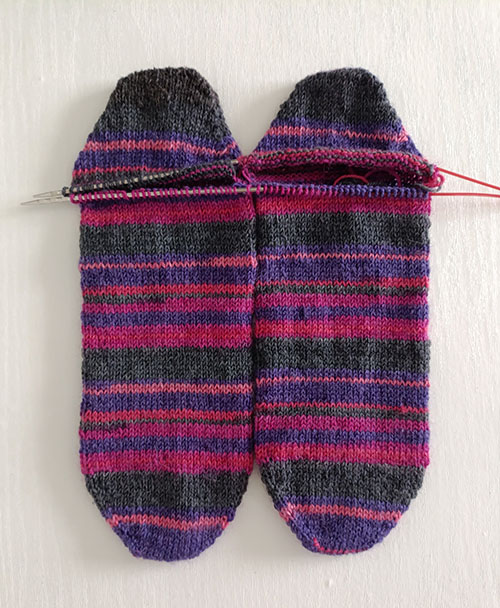
For sizes 34–35 and 36–37, no decreases are needed.
Row 1: K1, k2tog (left-leaning decrease), knit to last 3 stitches, k2tog (right-leaning decrease), k1. Repeat for the second sock. Turn the work and knit the front section without decreases.
Row 2: Knit all stitches.
Repeat rows 1–2:
for sizes 22–23; 24–25; 26–27; 28–29; 38–39 — 2 times;
for sizes 30–31; 32–33 — 1 time.
Then switch to the “small braided rib” pattern. Continue until the yarn runs out or the cuff reaches the desired length.
Bind off using a stretchy bind-off method based on 1×1 ribbing:
make yarn overs before purl stitches;
make reverse yarn overs before knit stitches.
Conclusion
This article explains in detail how to knit toe-up socks from self-striping yarn with an additional cast-on for the heel. By following this detailed pattern, you can easily knit stylish short socks using a minimal amount of yarn.
Read our other articles: