- Simple Knitting Hat: How to Knit a Simple Hat Step by Step (Beginner Guide)
- What Is a Simple Knitting Hat?
- Before You Start Knitting a Simple Hat
- Choosing Yarn
- Gauge Swatch
- How to Measure Head Size
- Knitting a Hat with Circular Needles
- How long to knit a hat
- How to Shape the Crown of a Simple Knitting Hat
- Decreasing Stitches in a Hat
- How to Decrease: Knit Two Together (K2tog)
- How to Decrease: Slip, Knit, Pass (SKP)
- A Simple Knitted Hat
- Right-Leaning Crown
- Materials
- Note
- Gauge
- Construction Overview
- Hat
- Decrease Tip (Evenly Spaced)
- Left-Leaning Crown
- Materials
- Note
- Hat
- Decrease Tip (Evenly Spaced)
- Conclusion
Simple Knitting Hat: How to Knit a Simple Hat Step by Step (Beginner Guide)
Want to learn how to knit a simple knitting hat? This step-by-step guide is perfect for beginners and will help you easily understand the basics of hat knitting.
In this tutorial, you’ll learn how to:
- choose the right yarn and needles
- measure your head correctly
- calculate stitches and rows
- knit a hat in the round
- shape and close the crown beautifully
This simple knitting hat pattern is versatile and suitable for men, women, and children.
What Is a Simple Knitting Hat?
A simple knitting hat is a basic, timeless design that fits well with any style. Once you learn this technique, you can easily customize your hat by adding:
- a folded brim
- a longer slouchy top
- textured or decorative patterns
Before You Start Knitting a Simple Hat
Before you begin, follow these essential steps:
- Choose your yarn
- Knit a gauge swatch
- Measure your head
- Calculate stitches and rows
Choosing Yarn
For a simple knitting hat, a medium-weight yarn works best:
- 200–240 meters (220–260 yards) per 100 g
- wool or wool blends are recommended
Yarn requirements:
- Adults: 150–200 g
- Children: 100–150 g
Recommended needle size:
- 3.5–4.5 mm (US 4–7), depending on your yarn
Gauge Swatch
Always knit a swatch to determine your gauge. This ensures your simple knitting hat fits correctly.
How to Measure Head Size
How to size a hat
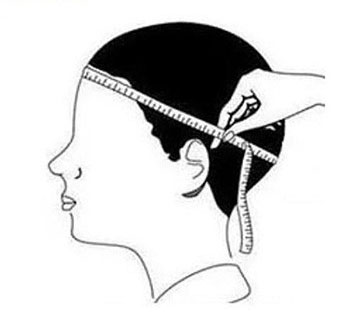
If you are knitting for yourself, use a hat that fits you well as a reference. Then measure it with a tape measure.

Measure the head circumference at the widest point, just above the ears. Do not pull the tape too tight.
Knitting a Hat with Circular Needles
Knitting in the round is much easier. All rows are worked on the right side. In patterned knitting, the number of purl stitches is reduced, and in stockinette stitch they are completely absent.
Circular knitting can be done using double-pointed needles (DPNs) or circular needles.
Double-pointed needles are usually sold in sets of five. Stitches are cast on in the usual way and distributed evenly across four needles. The stitches are then worked in the round, using the fifth needle.
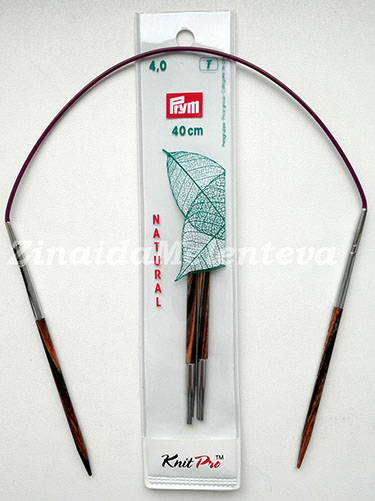
For a simple knitting hat, short circular needles (3–4 in = 8–9 cm tips) are ideal. The cable length should be about 16 in = 40 cm. You can also use standard 4–5 in = 11–12 cm needles, but they are not suitable for small hat sizes.
To avoid a gap at the beginning of the round and to make the cast-on edge neat, add one extra stitch.
Join carefully, making sure the stitches are not twisted. Slip the first stitch from the left needle purlwise onto the right needle. Slip the second stitch on the right needle over the first.
Move the slipped stitch back to the left needle. Tighten the yarn ends, place a marker to indicate the beginning of the round, and start knitting.
The calculator is designed for knitting in the round. If you choose to knit with straight needles, remember to add one edge stitch on each side.
Using your swatch, determine your gauge. Enter the desired size and gauge into the calculator to find the number of stitches needed for your hat.
How long to knit a hat
A simple knitting hat fits snugly around the head. The length from the brim to the crown depends on the size and is usually between 14–20 cm (5.5–8 inches). For a longer hat, add 5–10 cm (2–4 inches) as desired.
| Hat size, cm | 35 | 40 | 45 | 50 | 55 | 60 |
| Cap length, cm | 14 | 15 | 17 | 18 | 19 | 20 |
Enter your gauge and the desired hat length into the calculator to determine the number of rows required before shaping the crown.
How to Shape the Crown of a Simple Knitting Hat
Once you have finished the main part of your simple knitting hat, begin shaping the crown.
Divide the stitches into evenly sized sections (wedges) to create a neat and well-shaped top.
A hat calculator can help you determine the number of wedges and decrease rows. This will depend on your yarn thickness and gauge.
Lightweight yarns and larger hats can have up to 10–12 wedges, while thicker yarns typically require fewer sections for a balanced shape.
Most often, the crown of a simple knitting hat is divided into 4 or 6 sections. Decreases can be worked every round, every second round, or every third round, depending on the desired shape.
Decreasing Stitches in a Hat
The crown of a simple hat is shaped evenly across all sections. By decreasing one stitch in each section, you create a neat spiral effect. The finer the yarn, the more pronounced the spiral will appear.
With careful placement of decreases, the spiral can be directed either to the left or to the right.
To keep the crown balanced and avoid leaning to one side, work paired decreases at the beginning and end of each section.
How to Decrease: Knit Two Together (K2tog)
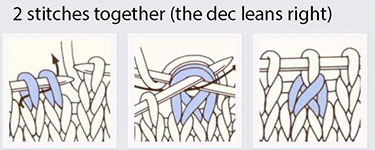
This is one of the easiest ways to decrease a stitch: knit two stitches together as one.
- Worked through the front loops, the decrease leans to the right.
- Worked through the back loops (twisted), the decrease leans to the left.
How to Decrease: Slip, Knit, Pass (SKP)
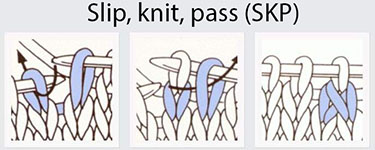
In this video, we show how to decrease one stitch on the right side (RS) using SKP (slip one stitch, knit the next stitch, then pass the slipped stitch over).
A Simple Knitted Hat
Now that we know how easy it is to knit a simple hat, let’s try making two versions with differently shaped crowns.
Right-Leaning Crown

Sizes: 35, 45, 55 cm
Materials
- Yarn: Katia Merino Aran, 100 g (150 m / 100 g), 52% superwash merino wool, 48% acrylic
- Circular needles: 4 mm and 4.5 mm (US 6–7), 40 cm (16″) cable
- Double-pointed needles (DPNs): 4.5 mm (US 7)
- Optional: Magic Loop method (use a 80 cm / 32″ circular needle)
Note
Needle size is only a guide.
If your gauge is too tight (too many stitches per 10 cm / 4″), use larger needles.
If your gauge is too loose (too few stitches), use smaller needles.
Gauge
16 stitches and 20 rows in stockinette stitch = 10 × 10 cm (4 × 4 inches)
Construction Overview
The hat is worked in the round from the bottom up using circular needles.
Switch to double-pointed needles when necessary.
Hat
Cast on 56 (72, 88) stitches using 4 mm (US 6) short circular needles.
Work 4 rounds in k1, p1 rib, repeating from * to * to the end of the round.
Switch to 4.5 mm (US 7) circular needles and work in stockinette stitch until the piece measures 12 (14, 17) cm (4.75 (5.5, 6.75) inches), or 24 (28, 34) rounds.
When the piece measures 12 (14, 17) cm, decrease 7 (9, 11) stitches evenly across the round.
Decrease Tip (Evenly Spaced)
To calculate evenly spaced decreases, divide the total number of stitches (e.g. 56, 72, 88) by the number of decreases (7, 9, 11).
In this example: 56 ÷ 7 = 8.
Work the decreases by knitting every 7th and 8th stitches together.
Repeat these decreases every 2nd round, 7 times, until 7 (9, 11) stitches remain.
Left-Leaning Crown

Sizes: 40, 50, 55 cm
Materials
- Yarn: Katia Merino Aran, 100 g (150 m / 100 g), 52% superwash merino wool, 48% acrylic
- Circular needles: 4.5 mm (US 7), 40 cm (16″) cable
- Double-pointed needles (DPNs): 4.5 mm (US 7)
- Optional: Magic Loop method (use an 80 cm / 32″ circular needle)
Note
Needle size is only a guide.
If your gauge is too tight (too many stitches per 10 cm / 4″), switch to larger needles.
If your gauge is too loose (too few stitches), switch to smaller needles.
Hat
Cast on 64 (80, 88) stitches using 4.5 mm (US 7) circular needles.
Work in stockinette stitch in the round until the piece measures 15 (18, 19) cm (6 (7, 7.5) inches), or 30 (36, 38) rounds.
Decrease Tip (Evenly Spaced)
To calculate evenly spaced decreases, divide the total number of stitches (e.g. 64, 80, 88) by the number of decreases to be made.
For example: 64 ÷ 8 = 8.
In this case, work the decreases by knitting every 7th and 8th stitches together.
Repeat these decreases every 2nd round, 7 times, until 8 (10, 11) stitches remain.
Conclusion
We hope this step-by-step beginner guide has helped you understand how to calculate and knit a simple hat in stockinette stitch.
Read also: